We live in a time when memories are captured at the touch of a finger. If you travel a lot or live far away from family, keeping memories tangible becomes that much more important. It’s all about the smells, sights, and feels that maintain that connection in-between times.

I grew up in a culture alive with stories, bright colors, and stunning textures that were part of everyday life. Then we moved to another country. So when my mom passed down a few of her saris, beautiful silks embroidered in rich threads and deeply traditional patterns, I wanted to find a way to use them in an everyday way. That’s when I thought of making sari fabric beads.
And no, I’m not apologizing.
Sari Not Sorry

A Sari is one of the traditional styles of clothing worn in my birth country of India. Typically, a sari is five or six yards of silk or soft cotton fabric with embellished borders. Each piece is woven and designed separately, many embroidered or stamped entirely by hand.
Block Printing
It’s A Wrap!

Saris are the most commonly worn traditional garb in India. Cotton saris are for everyday wear, while silk saris are mainly used for special occasions and are often worn only once. Thus, for the wearer, that sari holds a memory, be it a wedding, a birthday, or an anniversary to name a few.
Embroidery Styles
India is divided into 29 states. Every state in the country boasts its own distinct style of embroidery, beadwork, and even how the garment is worn. The hand-sewn designs and accompanying motifs have been passed down for thousands of years through many generations. While there are about 30 basic techniques, hundreds of interwoven designs have contributed to a rich heritage of Indian embroidery.
Silk Embroidery
Silk saris are usually woven with a border design. The design is then embroidered in metallic threads. These threads use real silver or gold hammered thin and wrapped around silk fibers to create a strand.
Silver and Gold
There are streets in India where you can still find rows of traditional workshops. Skilled artisans can be seen sitting on the ground and hammering silver on stone blocks. Wrapping the silver around a fiber helps to create a stronger strand.
Silk
Pure silk, however, is not reinforced with synthetic fibers and will eventually wear out. That’s what happened to my mom’s sari.
One day, my mom took out a favorite navy blue and silver sari. To her dismay, the beautiful and heavy silver embroidered borders had begun to rip away from the silk body of the sari. Knowing the sari itself held many special memories for my mom, I wanted to find a way to preserve at least some of it. That’s when I thought of wrapping the sari silk around some wooden beads I had.
Wrapped Beads
Wrapped beads are not a new idea. There are many methods and materials like paper, fabric, and even smaller beads to cover these big beads. I planned to make a necklace, so I wrapped my beads for a smoother, more comfortable finish.
I didn’t have access to the amazing world of online DIY demos, so I created my own process that I would love to share. The steps are straightforward, and once you get into the groove, you’ll be churning out beads in no time.
What You Need:

- medium or lightweight fabric
- small, sharp scissors
- a sewing needle
- matching thread
- nylon thread
- jewelry clasp or ribbon
Weave and Bias
Since I wanted as few fabric puckers as possible, I cut my rectangle on the bias. This bias technique comes in handy for all kinds of projects where you want the fabric to mold to a shape.
And in case you were wondering, this is a good bias, and here’s how it works:
Turn Weft
Fabric types differ both by the fibers used and how they are woven together, also known as the weave. The most common type of weaving is over and under. The taut “warp” fibers run top to bottom. The “weft” threads go over and under the warp threads and wrap around to create selvages (self edges). (See pic below)
Weaving makes the fabric rigid both lengthwise and widthwise. However, the fabric will “stretch” a little on the material’s diagonal or “bias.” So, for a rigid rectangle of fabric that will not stretch as you sew, cut your fabric shapes on the grain (warp or weft) lined up with the selvage (side edges).
I wanted a bit of stretch, so I cut my pattern on the diagonal or bias (dotted line below). That way, the fabric curved itself around the bead and eliminated much of the puckering.
Ok, are you ready to make some memory beads? Let go!
1 - Template Dimensions
First, measure your bead to create a template and cut it out of a piece of paper or directly from the fabric. To find your measurements (assuming you are using a round bead), either wrap your tape measure or a piece of string around your bead to find the circumference.
(Also, this step is only necessary if you plan on sewing your fabric onto the bead. If you decide to glue, you can trim the excess for a more seamless finish.)
Measurements:
Length - circumference of your bead plus ¼”.
Width - add a ¼” to the width of your bead.
That gives you the dimensions of the template, and that was the hardest part!
Remember The Bias!
Be sure to place the template at a 45-degree angle on your fabric, as pictured below. Whether you are sewing or gluing, this part is important if you want the fabric to flex around your bead and fit smoothly.
On to the next step - sewing!
2 - Fold and Sew
Fold your rectangle in half with the right sides together (being careful not to stretch the fabric), and sew a straight seam down the open ends. Next, carefully turn your fabric inside out so that the seams are inside the tube of fabric.
(You may get it right the first time, but for the next step, this tube should fit snugly around your bead. If the tube is loose, sew a deeper seam to narrow the tube until the fabric is taut. After that, you can simply repeat your measurements.)
3 - Add the Bead
Now that your tube is ready, slip the bead in so that the bead holes are facing out.
4 - Sew and Tuck
Next, run a quick stitch around the open ends like you would for a drawstring pouch. Don’t knot or cut the threads off. The idea is to be able to pull this thread and draw the fabric close. Pull the thread as tight as you can without breaking it and finesse the wrinkles out of the fabric. You don’t have to get all the wrinkles out yet.
Now pull the needle that is still attached through the hole of the bead. As you do this, the excess fabric will get pulled into the hole as well. You don’t want to pull too hard and break your sewing thread, just enough to tuck in the fabric. A chop-stick or the tip of your scissors can help tuck the fabric in as well.
5 - Repeat Step Four
Without cutting your thread, run the same stitch around the other opening and draw it closed. Thread the needle back through the bead hole, drawing the fabric in from the opposite side of the bead. Take turns pulling the thread and smoothing your material until it is taut around the bead.
6 - Secure the Fabric
Just to be sure, I like to pass the needle back and forth through the hole a few more times before securing my stitches with a knot.
And, just like that, you have your first bead. Congratulations!
The description is a lot more tedious than the process itself, and you will quickly get the hang of it! Plus, you will love your beautiful one-of-a-kind creations! When you have enough beads, you can string them together using a needle and nylon thread separated by accent beads or whatever else you might like to use.
Here are some other covered bead techniques you can try:
Knot and Tube Method
An even easier version of this is to make one super-long tube, slide the beads in, and knot the tube as you go.
Crochet
These crocheted beads look pretty complicated, but the end results are beautiful. What do you think?
Seed Beads
This one I thought was the prettiest and definitely one I want to try - a bead-covered bead! It looks so vintage!
There are lots of amazing tutorials online. Try as many as you can or create your own method. The most important thing is to have fun!
And finally, the big reveal…
The Finished Project
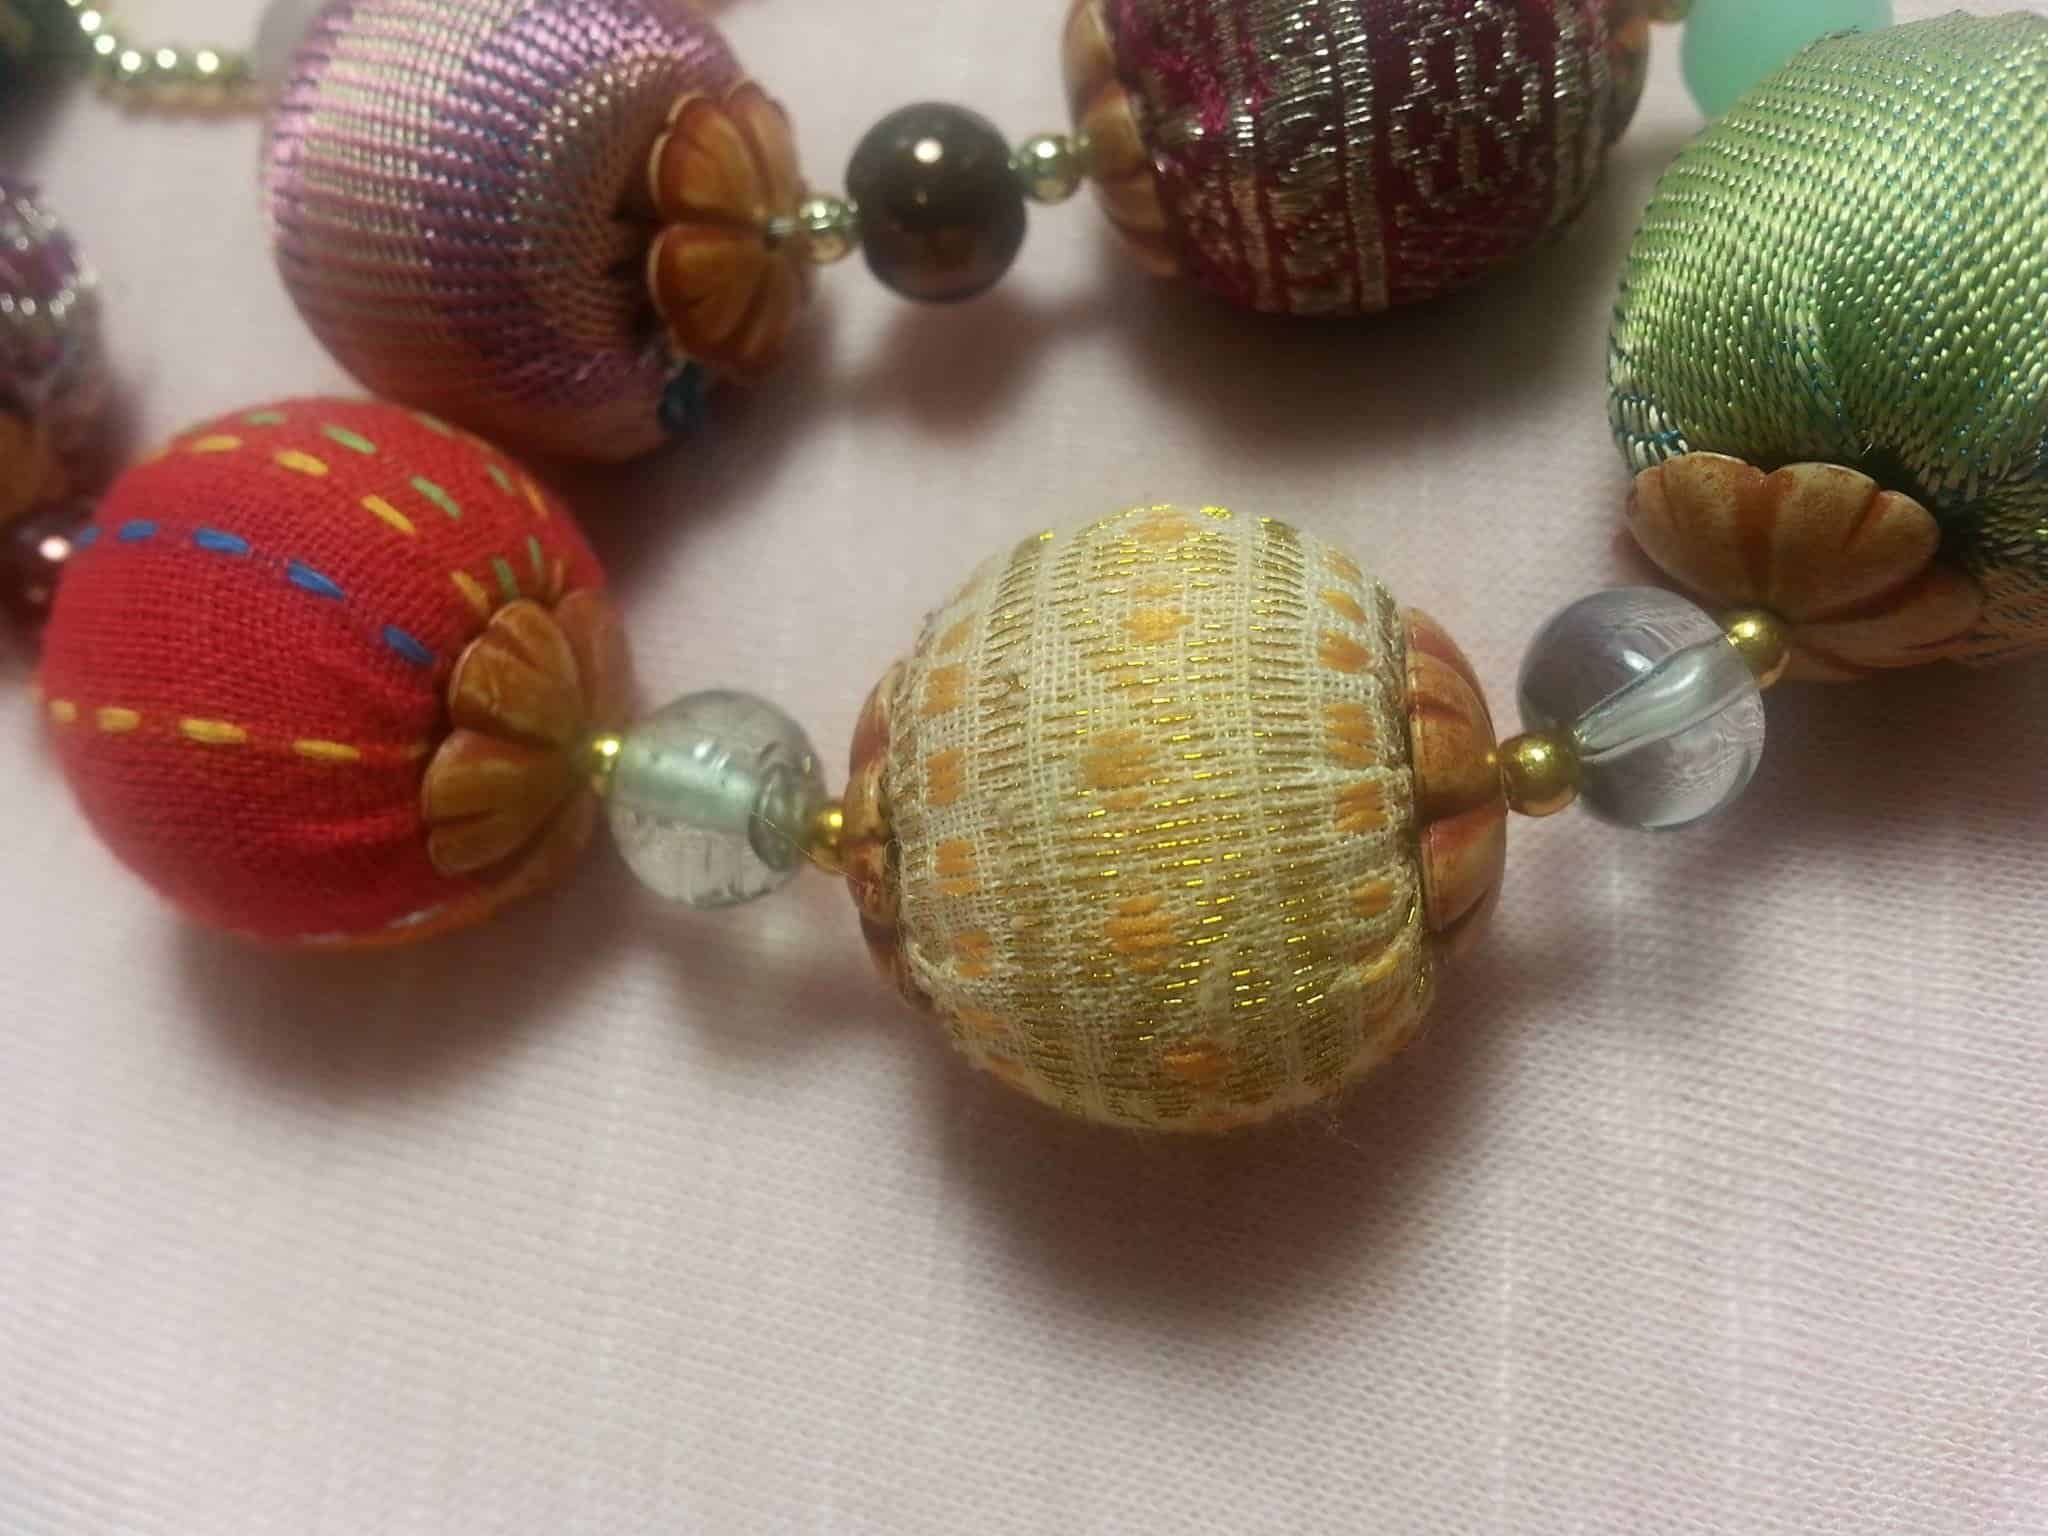
I love how my necklace turned out! Whenever I wear my necklace, I remember all the people and events that make my memories special. You can use a special shirt, prom dress, tie, or any other fabric to create your own designer beads. There is no limit to what you can make!
I hope this project inspired you to make memory beads to keep or create a unique gift for someone special.
As always, remember to check back for new craft ideas that are simple and fun!
Happy DIY-ing!


